
2.教程练习
从官网提供的学习教程helloworld开始练习,
2.1 环境规划
再次强调,使用的开发方式是VitrualBox+Ubuntu,下载VitrualBox和Ubuntu镜像(版本>=20.04),并安装虚拟机。 详细内容不再赘述。 sel4开发环境设置:参考,
环境搭建是否正常取决于能否运行第一个helloworld项目。 详细步骤为:
1)repo工具安装
mkdir ~/binPATH=~/bin:$PATHcurl https://storage.googleapis.com/git-repo-downloads/repo > ~/bin/repochmod a+x ~/bin/repo
2)lib依赖库和编译工具安装
#The basic build package on Ubuntu is the build-essential package. To install run:sudo apt-get updatesudo apt-get install build-essential#Additional base dependencies for building seL4 projects on Ubuntu include installing:sudo apt-get install cmake ccache ninja-build cmake-curses-guisudo apt-get install libxml2-utils ncurses-devsudo apt-get install curl git doxygen device-tree-compilersudo apt-get install u-boot-toolssudo apt-get install python3-dev python3-pip python-is-python3sudo apt-get install protobuf-compiler python3-protobufsudo apt-get install qemu-system-arm qemu-system-x86 qemu-system-miscsudo apt-get install gcc-arm-linux-gnueabi g++-arm-linux-gnueabisudo apt-get install gcc-aarch64-linux-gnu g++-aarch64-linux-gnu
3)Python依赖库
pip3 install--user setuptoolspip3 install--user sel4-deps# Currently we duplicate dependencies for python2 and python3 as a python3 upgrade is in processpip install--user setuptoolspip install--user sel4-deps
4)编译库依赖
sudo apt-get install clang gdbsudo apt-get install libssl-dev libclang-dev libcunit1-dev libsqlite3-devsudo apt-get install qemu-kvm
5)证明依赖性
sudo apt-get installpython3 python3-pip python3-devgcc-arm-none-eabi build-essential libxml2-utils ccachencurses-dev librsvg2-bin device-tree-compiler cmakeninja-build curl zlib1g-dev texlive-fonts-recommendedtexlive-latex-extra texlive-metapost texlive-bibtex-extramlton-compiler haskell-stack
2.2 下载代码
在下载编译教程的代码之前安装python依赖项
pip install --user aenumpip install --user pyelftools
下载代码前配置repo邮箱信息
git config --global user.email "you@example.com"git config --global user.name "Your Name"
下载代码(这里使用sel4官方代码进行练习,从github下载)
mkdir sel4-tutorials-manifestcd sel4-tutorials-manifestrepo init -u https://github.com/seL4/sel4-tutorials-manifestrepo sync
2.3HelloWorld应用程序生成
初始化hello-world文件夹
./init --tut hello-world --solutionhello-world 是示例的名称。 您可以将此名称替换为其他示例。 在命令中添加后缀 --solution 即可完成代码。 可以看到生成了下面的hello-world文件夹,里面有c代码。
2.4 代码编译
cd hello-world_buildninja
编译成功后显示:
2.5 代码运行
# In build directory, hello-world_build./simulate
成功后显示:
运行后,Ctrl-A,X退出qemu模拟工具。
3.HelloWorld代码分析
编译时我们使用了ninja命令。 Ninja是由Google程序员推出的一款注重速度的重建工具。 通常Unix/Linux上的程序是通过make/makefile来编译的,而Ninja的编译是通过任务并行组织的,大大提高了创建速度。
可见ninja和makefile都是同一级别的重构工具,都是编译器使用的生成规则。
可以在 sel4-tutorials-manifest/hello-world_build/build.ninja 文件中听到
执行ninja命令会通过这个build.ninja进行编译,你会发现hello-world代码。
cmake是在makefile之上的一层包装。
CMakeLists.txt – cmake 用于将根任务合并到更广泛的 seL4 构建系统中的脚本。
src/main.c - 用于初始任务的单个源文件。
hello-world.md - 为本教程生成的自述文件。
int main(int argc, char *argv[]) {printf("Hello, World!n");printf("Second hellon");return 0;}
如果您更改了应用程序的源代码,请重新运行重建项目:
Bash# In build directory, hello-world_buildninja
然后运行模拟器:
# In build directory, hello-world_build./simulate
4. 学习资料
熟悉sel4的原理,主要从两个途径学习:
一侧是sel4的参考指南:
,
另一方面就是根据Tutorials教程一步步开始做实验,这样理论和实践才能结合起来。 (turorials中与camkes相关的例子可以先不研究)
辅助库介绍:
在教程项目中,介绍了其他辅助库。 除了 sel4 微内核之外,还需要一些库才能让您的应用程序运行。
sel4内核:第一个是sel4内核。 单个内核无法运行像helloworld这样的程序,因为这个程序需要链接到其他库,例如stdio中的printf。 然而,程序与内核交互时,需要知道内核提供的标准API。 。
libsel4:sel4内核提供的API由内核源代码项目上面的libsel4库描述。 以上是sel4内核支持的标准API。
sel4_libs:当程序连接到libsel4时,它可以使用sel4内核的标准API。 这类似于Linux内核提供的标准API,与操作系统密切相关。 非 posix 标准。 另外,这个libsel4库不太好用,所以在它上面叠了一个sel4_libs库。 该库是对 sel4 标准 API 的进一步功能封装,例如分配 cap 对象。 调用者不需要知道更高层的sel4标准。 api 调用的详细信息。
musllibc:这是一个开源libc库runtime源码编译详细,与sel4没有直接关系。 本项目中使用它主要是提供标准的符合posix的api,其他操作系统也可以使用。 因此,应用程序可以直接使用libsel4中的函数,或者sel4_libs中的函数,并且musclibc中的函数可以用于标准函数。 为了连接muslibc和sel4_libs,sel4_libs提供了libsel4muslcsys等库。 muslibc中的一些函数通过syscall方法调用到socket库libsel4muslcsys,该socket库会调用sel4_libs中相应的函数。 事实上,muslibc中的一些函数可能会直接调用libsel4的函数socket。
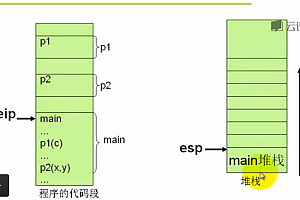
sel4runtime:通常程序上有一个main函数作为程序的入口点。 不过这个程序的运行并不是从main开始的。 在运行main之前,虽然做了一些其他的工作,比如堆栈指针的设置、环境变量的获取、其他一些计划好的工作等等。 通常,编译器,例如gcc编译器,编译helloworld这样的代码时,会指定程序的入口地址为_start,即会搜索源代码,将以_start开头的代码放在程序代码段的末尾。 起始位置,hello_world.c的源代码中没有_start函数或标签,因此这个标签来自其他地方,并且是hello_world.c将要链接到的源代码。 在sel4tutorial项目中,我们使用sel4runtime(上面是源代码)与lshello_world.c一起编译链接。 sel4runtime项目提供了各个框架的_start入口标签,后面是框架的一些汇编语言、处理堆栈等,然后跳转到一个简单的c函数,该函数收集环境变量。 传入参数等,最后调用main函数。
其他信息:
seL4内核启动分析:
CSDN中的sel4教程:
sel4源码注释:
前言:
在这篇文章中,有很多关于环境搭建的部分。 您可以添加我,Momo thatway1989,并在群组中添加注释。 然后拉你进这个公众号的交流群:OS与AUTOSAR研究交流群,大家可以讨论建筑环境、汽车软件、操作系统软件等知识runtime源码编译详细,一起学习。 最近回想一下自己学习技术的过程,如下:
“什么都知道一点,什么都不掌握,
我什么都可以做,又什么都不能做。
以专业人士的身份入门并说服你,可谓是一名杂七杂八的程序员。”
后续会持续更新,纯干货分析,无广告,无打赏,欢迎转载,欢迎评论交流!

![编译驱动的内核源码-[OpenWrt] 使用SDK编译Linux内核驱动](https://www.wkzy.net/wp-content/themes/ceomax/timthumb.php?src=https://www.wkzy.net/wp-content/uploads/2024/04/1714318441748_1.png&h=200&w=300&zc=1&a=c&q=100&s=1)