
Qt 是一个跨平台的 C++ 应用程序开发框架,广泛应用于图形用户界面 (GUI) 开发。 Qt提供了开发人员所需的一系列工具和库,包括图形界面设计工具、网络通信、数据库、多媒体、XML、OpenGL等。Qt的开源版本可以免费使用,如果需要商业使用,需要订购商业许可证。
Qt的安装有两种方式:补码安装和源码编译安装。 二进制补码安装是指直接下载并安装编译好的程序包。 安装过程简单快捷,并且很难自定义编译选项。 编译安装源码需要从Qt官网下载源码包,按照一定的步骤编译安装。 尽管源代码的编译和安装过程比较漫长,但您可以根据自己的需求进行自定义编译,从而获得更好的性能和功能。
本文将介绍如何编译和安装Qt源码,主要包括以下步骤:
1.下载Qt源码包
2.安装需要的依赖库
3.配置编译选项
4.编译源码
5.安装Qt
1.下载Qt源码包

首先需要从Qt官网(https://www.qt.io/download)下载Qt源码包。 选择需要的版本和平台,下载后解压到任意目录。
2.安装需要的依赖库
Qt源码编译需要一些依赖库的支持,包括:
- C++ 编译器(GCC 或 Clang)
-制作工具
-OpenGL和GLU库
-X11 库(仅限 Linux)
-DBus 库(仅适用于 Linux)
- gstreamer 库(仅限 Linux)
这个库可以通过系统的包管理器来安装,例如在Ubuntu上,可以使用以下命令来安装:
````
sudo apt-get install build-essentiallibgl1-mesa-dev libglu1-mesa-dev
libx11-devlibxext-devlibxrandr-devlibxi-devlibxcb1-devlibx11-xcb-dev
libxcb-glx0-devlibxcb-keysyms1-devlibxcb-image0-devlibxcb-shm0-dev
libxcb-icccm4-devlibxcb-sync0-devlibxcb-xfixes0-devlibxcb-shape0-dev
libxcb-randr0-devlibxcb-render-util0-devlibxcb-xinerama0-devlibxcb-xinput-dev
libxcb-xtest0-devlibxcb-xv0-devlibxcb-xvmc0-devlibdbus-1-devlibgstreamer1.0-dev
libgstreamer-plugins-base1.0-dev

````
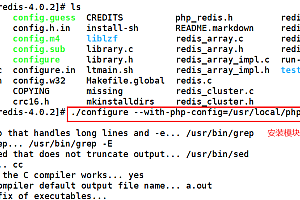
3.配置编译选项
进入Qt源码目录Qt源码编译脚本Qt源码编译脚本,执行以下命令进行配置:
````
。 /configure-opensource-confirm-license-release-static-no-icu-no-pch-nomakeexamples-nomaketests-qt-zlib-qt-libpng-qt-libjpeg-qt-freetype-no-xcb-xlib-no- opengl-no-sql-sqlite-no-sql-mysql-no-sql-psql-no-sql-odbc-no-openssl-no-nis-no-cups-no-gtkstyle-no-xinput2-no-xcb- no-xkb-no-glib-no-pulseaudio-no-alsa-no-feature-gif-no-feature-libpng-no-feature-libjpeg-no-feature-libmng-no-feature-libtiff-no-feature- textodfwriter-no-feature-textmarkdownwriter-no-feature-xmlstream-no-feature-xmlpatterns-no-feature-ftp-no-feature-http-no-feature-socks5-no-feature-proxymodel-no-feature-filesystemmodel- no-feature-process-no-feature-sharedmemory-no-feature-xml-no-feature-xmlpatterns-no-feature-xmlstream-no-feature-network-no-feature-clipboard-no-feature-imageformat_ppm-no-特征-imageformat_xbm-no-feature-imageformat_xpm-no-feature-imageformat_jpeg-no-feature-imageformat_png-no-feature-imageformat_bmp-no-feature-imageformat_ppm-no-feature-imageformat_xbm-no-feature-imageformat_xpm-no-feature- imageformat_jpeg-no-feature-imageformat_png-no-feature-imageformat_bmp-no-feature-imageformat_mng-no-feature-imageformat_tiff-no-feature-imageformat_tga-no-feature-imageformat_pic-no-feature-imageformat_eps-no-feature-imageformat_pcx-无特征-imageformat_hdr-无特征-imageformat_exr-无特征-imageformat_pbm-无特征-imageformat_svg-无特征-imageformat_ico-无特征-imageformat_pgm-无特征-imageformat_tif-无特征-imageformat_webp-无-特征图像格式_gif
````
这里的编译选项可以根据需要自定义,可以根据官方文档(https://doc.qt.io/qt-5/configure-options.html)进行选择。
4.编译源码
执行以下命令进行编译:
````
制作-j4
````
这里的“-j4”表示用4个线程编译,可以根据CPU核心数自定义。
编译过程可能需要一些时间,具体取决于 CPU 性能和编译选项设置。
5.安装Qt
编译完成后,执行以下命令进行安装:
````

须藤make安装
````
安装完成后,可以将Qt bin目录添加到系统的PATH环境变量中。 例如,您可以在Ubuntu上编辑~/.bashrc文件并添加以下内容:
````
exportPATH=/usr/local/Qt-5.15.2/bin:$PATH
````
这样就可以直接在终端中使用Qt命令了。
总结
Qt的源码编译和安装其实比较冗长,你可以根据自己的需要进行自定义编译,从而获得更好的性能和功能。 编译过程中需要注意安装所需的依赖库,并根据需要设置编译选项。 编译过程可能需要一些时间,具体取决于 CPU 性能和编译选项设置。 安装完成后,需要将Qt bin目录添加到系统的PATH环境变量中,就可以直接在终端中使用Qt命令了。


![编译驱动的内核源码-[OpenWrt] 使用SDK编译Linux内核驱动](https://www.wkzy.net/wp-content/themes/ceomax/timthumb.php?src=https://www.wkzy.net/wp-content/uploads/2024/04/1714318441748_1.png&h=200&w=300&zc=1&a=c&q=100&s=1)