
树表拖放排序
开始
最近有一个项目潜在需求,就想着趁着需求紧急,直接写完,受教了~

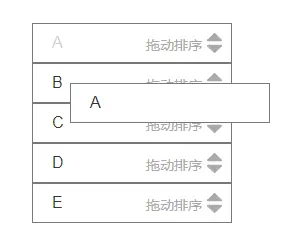
需求是对表格进行拖放排序。 本来网上找到很多这样的要求。 然而,这个项目的需求是对树表进行拖放排序,所以很多情况下两者都要进行。 在互联网上搜索后elementui表格遍历,我仍然找不到它。 没有令人满意的答案,所以我做了一些研究。 现在我就记录一下,分享给大家。 我们先来看看要达到的治疗效果。
为了简单地阐明这个想法,我们需要先将树数据转换为列表数据,然后拖动它。 拖动完成后,将根据前端要求将数据传递到后台,完成表格排序。
那么,有哪些注意点呢? 既然是树结构,那么我们在排序的时候一定要确定只有同级才能排序。 那么另一个注意点来了。 拖动父节点进行排序时,需要将子节点也带上,否则会导致子节点脱离父节点的情况。
我们上去看看如何实现吧~
1.安装sortable.js
npm install sortablejs --save2.将其引入到组件中
import Sortable from 'sortablejs'3. 表单结构
<template><div><el-button @click="clickBtn" type="success">排序</el-button><el-tableref="SortTable"row-key="id":key="key":data="tableData"default-expand-all:tree-props="{ children: 'children',hasChildren: 'hasChildren' }"><el-table-column prop="name" label="名称"></el-table-column><el-table-column prop="description" label="描述"></el-table-column><el-table-column prop="time" label="时间"></el-table-column></el-table></div></template>
4. 数据结构

{return {tableData: [{id: 1,name: "根节点",description: "这是根节点",time: "2021-10-01 10:00:00",pid: null,children: [{id: 2,name: "子节点1",description: "这是子节点1",time: "2021-10-02 11:00:00",pid: 1,children: [{id: 4,name: "子节点1-1",description: "这是子节点1-1",time: "2021-10-03 12:00:00",pid: 2,},{id: 5,name: "子节点1-2",description: "这是子节点1-2",time: "2021-10-04 13:00:00",pid: 2,},],},{id: 3,name: "子节点2",description: "这是子节点2",time: "2021-10-05 14:00:00",pid: 1,children: [{id: 6,name: "子节点2-1",description: "这是子节点2-1",time: "2021-10-06 15:00:00",pid: 3,},{id: 7,name: "子节点2-2",description: "这是子节点2-2",time: "2021-10-07 16:00:00",pid: 3,},],},],},],activeRows: [], // 转换为列表的数据扁平化key: "",};},
5.拖放方法(该方法下面将分为几个部分)
// 获取表格元素const tbody =document.querySelector('.el-table__body-wrapper tbody')Sortable.create(tbody, {animation: 200,// 定义排序动画的时间forceFallback: true,// boolean 如果设置为true时,将不使用原生的H5的拖拽;})
onStart: () => { // 开始拖拽前把树形结构数据扁平化this.activeRows = this.treeToTile(this.tableData)// 把树形的结构转为列表再进行拖拽},// this.treeToTile方法用于将树形数据扁平化,// 这里提供一下后面需要使用的方法,网上一搜一大把treeToTile(treeData, childKey = "children") {return [].concat(...treeData.map((node) => [node,...this.treeToTile(node[childKey] || []),]));},getFlatNode(nodes, flatList, childrenKey = "children") {nodes.forEach((node) => {flatList.push(node);if (node[childrenKey]) {getFlatNode(node[childrenKey], flatList, childrenKey);}});return flatList;},// listToTree方法用于将扁平化数据转化为树形结构数据listToTree(data, idName = "id", parentIdName = "pid") {const map =new Map(data.map((item) => [item[idName], item]));const result = [];data.forEach((item) => {const parent = map.get(item[parentIdName]);if (parent) {parent.children = parent.children || [];parent.children.push(item);} else {result.push(item);}});return result;},
// 这里解释一下,需要判断如果oldRow.pid == newRow.pid,//那么说明这两个节点为同一个父节点的子节点,// 那么可以移动,反之则不可移动onMove: ({ dragged, related }) => {// 移动的那个元素const oldRow = this.activeRows[dragged.rowIndex]// 新的元素const newRow = this.activeRows[related.rowIndex]// 移动的元素与新元素父级pid不相同if (oldRow.pid !== newRow.pid) {return false // 不允许跨级拖动}
onEnd: e => {// 通过以下操作,就可以实现对树形数据中节点的拖拽排序功能。// 注意,代码中的拖拽排序只能在同一个父节点下进行,const oldRow = this.activeRows[e.oldIndex] // 移动的那个元素const newRow = this.activeRows[e.newIndex] // 新的元素if (e.oldIndex === e.newIndex ||oldRow.pid !== newRow.pid) returnconst index = this.activeRows.indexOf(oldRow)if (index < 0) returnconst changeIndex = e.newIndex - e.oldIndexthis.activeRows.splice(index, 1)this.activeRows.splice(index + changeIndex, 0, oldRow)if (oldRow.pid !== newRow.pid) {this.$message.warning('只能同层级内排序')return}else {// 在这里判断并实现拖拽父级,带动其下的子节点一起移动// 使用 splice 方法和 e.newIndex// 参数将 newRow 从 activeRows 数组中删除,// 并返回被删除的元素 oldData。使用 splice 方法// 和 e.newIndex 参数将 oldData 插入到 activeRows// 数组中的新位置。// 根据 e.newIndex 和 e.oldIndex 的大小关系,// 分别对子节点进行移动操作。// 如果新位置在原始位置之前,则需要将子节点一并移动;// 如果新位置在原始位置之后,则需要将子节点移动到新位置之后。// oldRow有, newRow无if (oldRow.children && !newRow.children) {const oldData = this.activeRows.splice(e.newIndex, 1)[0]this.activeRows.splice(e.newIndex, 0, oldData)if (e.newIndex < e.oldIndex) {// 有子元素的,子元素需要同样跟上来const flatChildren = []this.getFlatNode(oldData.children || [],flatChildren,'children')if (flatChildren.length > 0) {for (let i = 1, len = flatChildren.length; i <= len; i++) {const childData = this.activeRows.splice(e.newIndex + i, 1)[0]this.activeRows.splice(e.newIndex + i, 0, childData)}}} else {const flatChildren = []this.getFlatNode(oldData.children || [], flatChildren,'children')if (flatChildren.length > 0) {for (let i = 1, len = flatChildren.length; i <= len; i++) {const childData = this.activeRows.splice(e.oldIndex, 1)[0]this.activeRows.splice(e.newIndex, 0, childData)}}}}this.$nextTick(function(){this.activeRows.map(item=>{// 注意这里必须删除children属性,或者在// 上面方法遍历时直接去除children属性delete item.children})// 重新生成树的数据let arr = listToTree(this.activeRows,'id','pid');// 调用接口按后端要求传递数据,完成拖拽排序})}}
6.解决bug
注意点来了。 这时候我发现改了的数据已经没有问题了,页面上表格的显示还是错误,子节点还是没有跟上。 找了半天,发现需要给el-table绑定key属性。 我查了文档,找到了row-key属性,但是没有找到key。
再次查了一下,发现关键不是elementui,而是Vue操作虚拟DOM算法。 VNodes 在比较新旧节点时被识别。 如果这个key不更新的话,部分DOM就不会重新渲染,表格大概率也不会发生变化elementui表格遍历,所以我们还需要在处理完数据后添加如下代码,这样这个函数就可以予以实施。
this.key=new Date().getTime().toString()最后附上sortablejs的文档,大家可以参考一下:
七、总结

那么,这就是本次分享的全部内容了。 事实上,对表进行排序的方法有很多种。 您不妨尝试使用其他插件或使用原生形式进行手写。 欢迎大家交流分析。
如果这篇文章对你有帮助,请用你的小手点个赞。 如果有什么不对的地方,欢迎大家指出!
结尾